Dark Web OSINT Suite
Source: https://github.com/N1ckw1ck/Dark_OSINT
A collection of tools for threat intelligence research on Tor hidden services (the dark web).
The tools are modular. Some are useful standalone, others are designed to chain together into a pipeline. A subset are specifically for running that pipeline unattended on a remote server.
Standalone Tools
These can be run independently with no dependency on the rest of the suite.
The Pipeline
These tools are designed to chain together. Each produces output consumed by the next. The full chain can be run step by step or automated via pipeline.py.
Erebus_*.jsonerebus_urls_*.txtMnemosyne_batch_*.jsonlocalhost:7777python pipeline.py "your query" --pages N
VPS / Automation Layer
pipeline.py can be run locally or on a VPS — the VPS is recommended to avoid making sustained scanning requests from a home IP. run-pipeline.sh is the cron-friendly shell wrapper for unattended scheduled execution.These tools are only relevant if you are running the pipeline unattended on a VPS and pulling results back to a local machine.
vps-setup.sh hardens a fresh Debian 12 VPS and configures all users, firewall rules, and dependencies. validate_batch.py runs on the VPS after each pipeline execution to verify and move output files into the SFTP outbox.Overview
The Dark Web OSINT Suite is a collection of Python-based tools for threat intelligence research on Tor hidden services. All tools route exclusively through Tor via Socks5h proxies — no clearnet requests are ever made at any point in the pipeline.
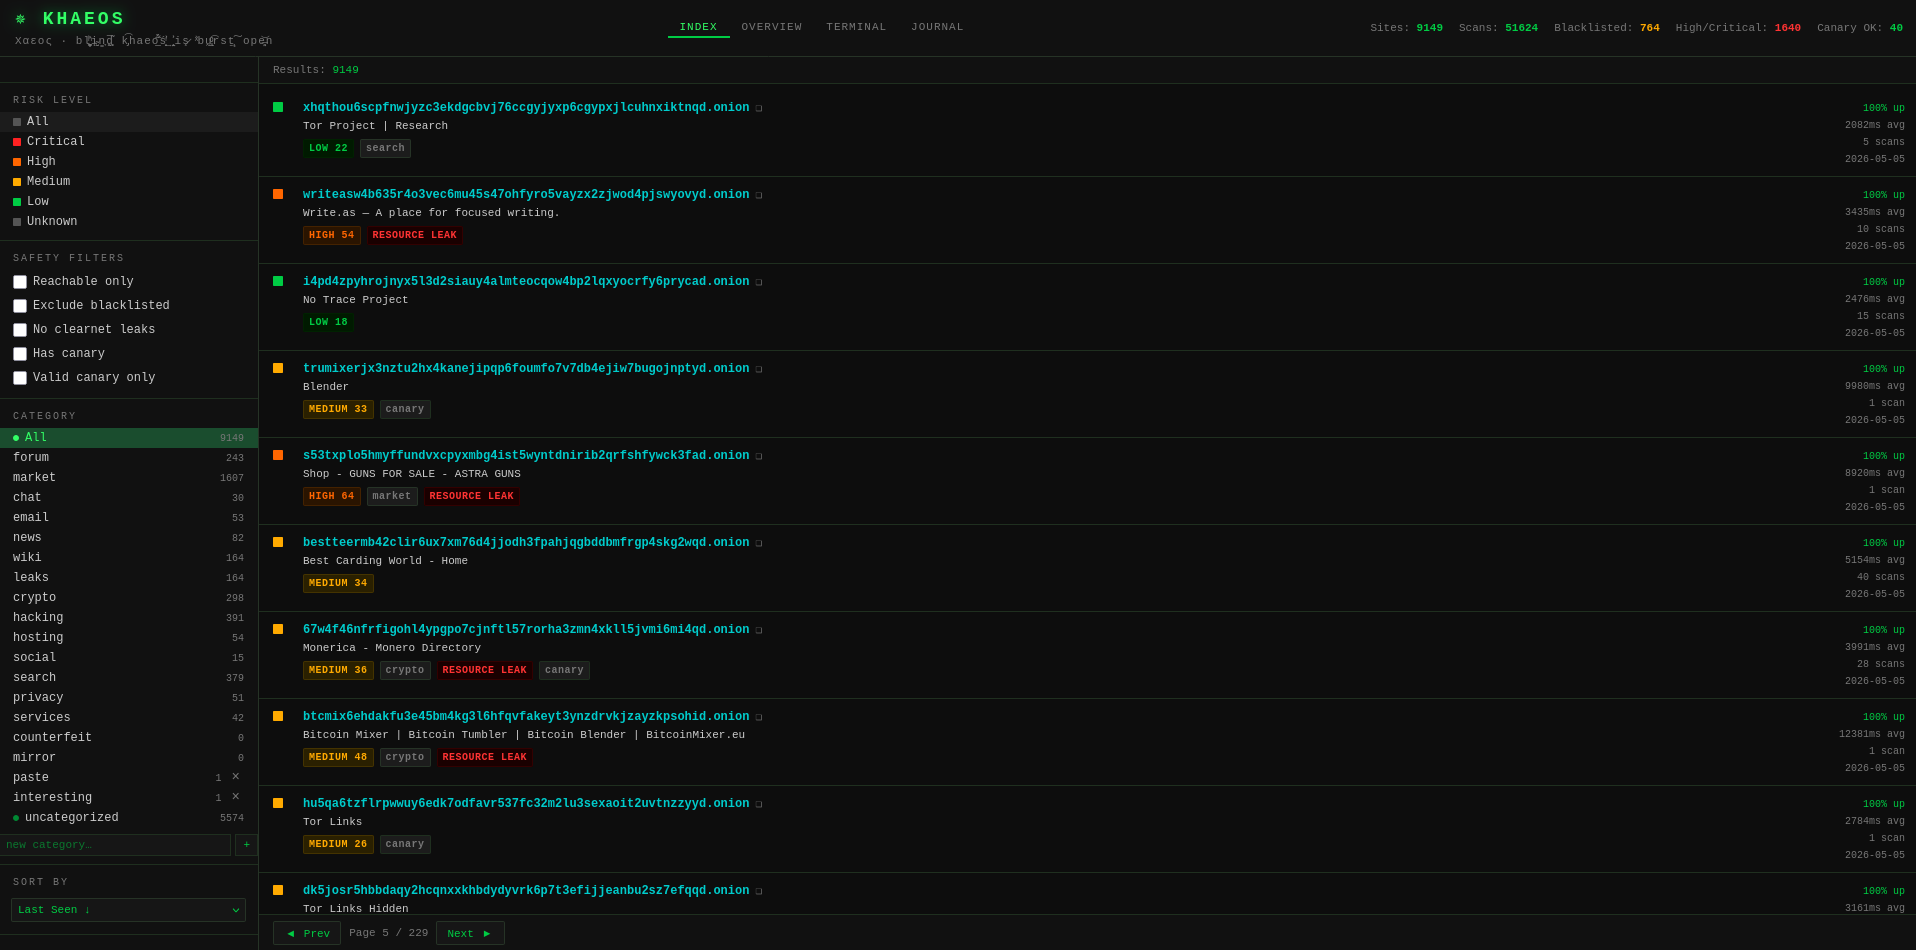
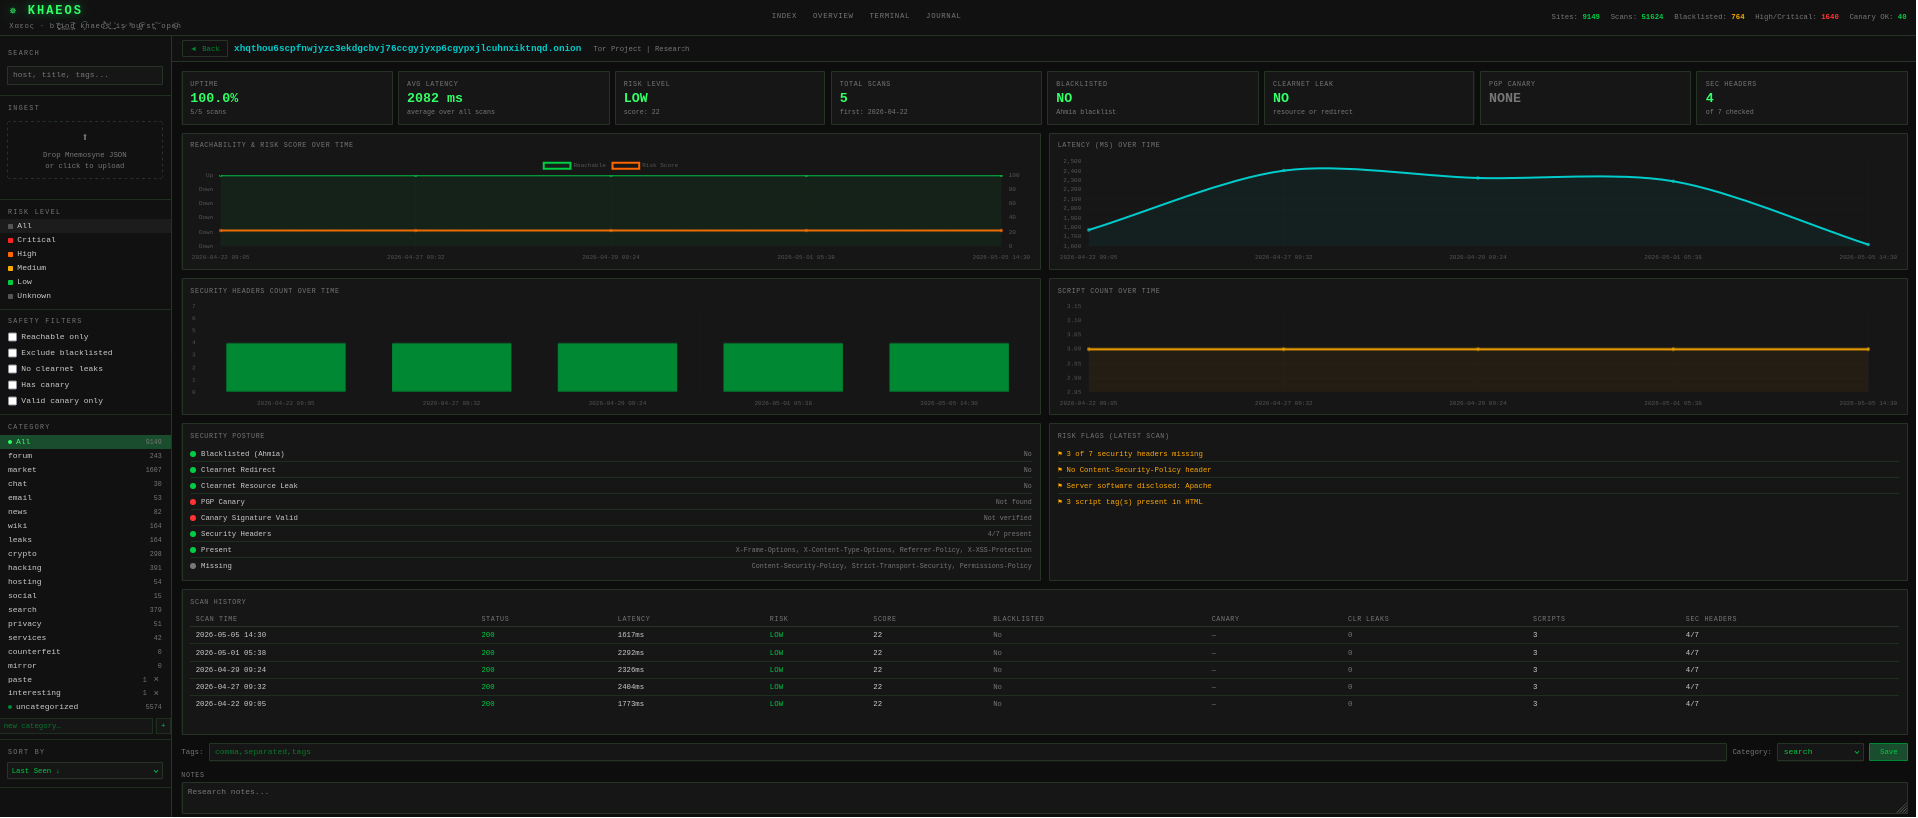
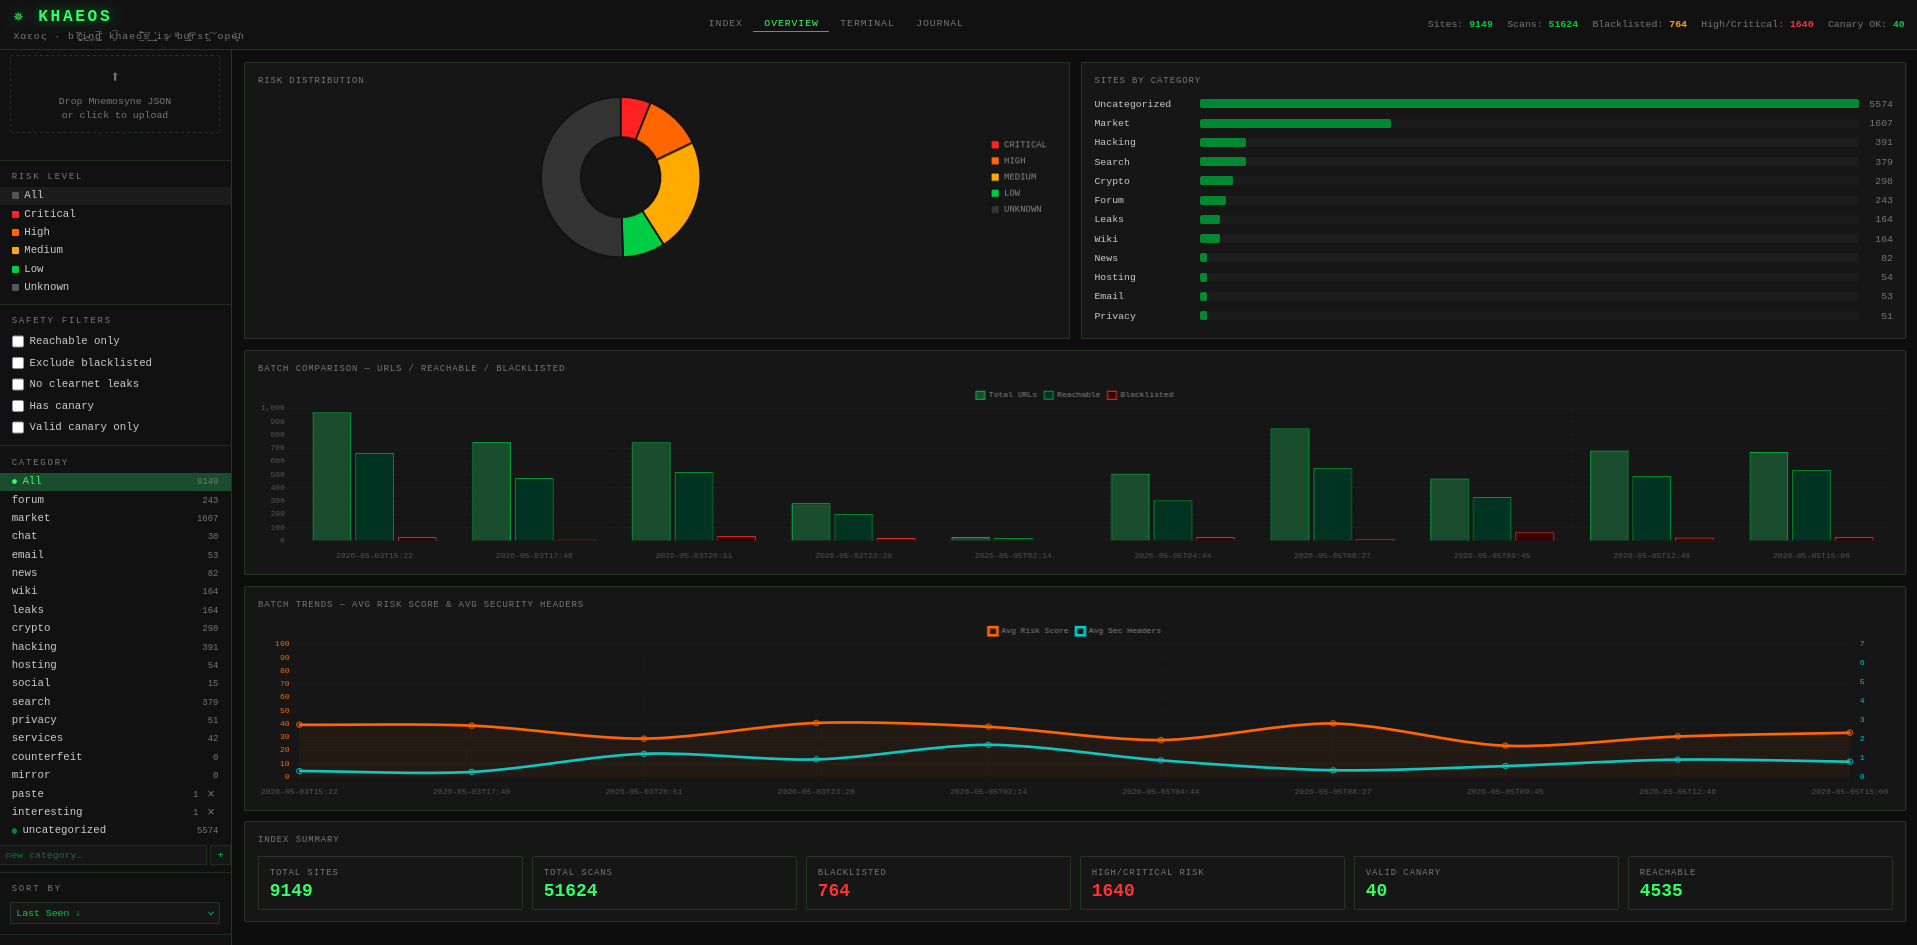
Tools are designed to feed into Khaeos — a persistent SQLite-backed intelligence index that accumulates every scan result over time. Rather than reading flat JSON files, Khaeos gives you a searchable, filterable web interface with per-site history, time-series charts of risk score drift and latency, batch comparison dashboards, and more.
README: https://github.com/N1ckw1ck/Dark_OSINT/blob/main/README.md
Prerequisites
- Python 3.11+
- Tor binary —
brew install tororsudo apt install tor - GnuPG —
brew install gnupgorsudo apt install gpg - Recommended: run in a VM (Whonix preferred) or VPS behind a VPN
- Recommended: Install dependencies to a virtual environment
Install all dependencies
pip install -r requirements.txt
# Core
python-gnupg
stem
beautifulsoup4
requests[socks]

# Erebus (display)
rich

# Khaeos (web server)
fastapi
uvicorn
python-multipart
Individual dependencies are listed per tool to facilitate standalone use
The Pipeline
The tools are designed to chain together. Each produces output consumed by the next.
- Erebus searches dark web indexes for a query term and outputs a JSON result set.
- Hemera parses the Erebus JSON and extracts a clean list of
.onionURLs. - Mnemosyne performs pre-visit safety analysis on each URL over Tor.
- Khaeos ingests the Mnemosyne JSON into a persistent SQLite intelligence index and serves a local web app for visualization.
Automated pipeline
The full chain can be run with a single command via pipeline.py:
python pipeline.py "ransomware"
python pipeline.py "forums" "leaked credentials" --pages N
python pipeline.py "malware" --no-khaeos   # skip ingest
Manual step-by-step
python d_erebus.py --pages N --save-j
python d_hemera.py Erebus_<query>_<timestamp>.json
python d_mnemosyne.py --batch erebus_urls_<query>_<timestamp>.txt --save
python d_khaeos.py --ingest Mnemosyne_batch_<timestamp>.json --serve
Erebus — Dark Web Search
Aggregates search results across multiple .onion indexes for a given query. Circuit is rotated between each index so each search engine sees a different Tor identity. Results are deduplicated by canonical host with branched path display.
Install
pip install 'requests[socks]' stem beautifulsoup4 rich
Usage
python d_erebus.py
python d_erebus.py --pages 5       # pages per index (1-10)
python d_erebus.py --save-j        # save to JSON
python d_erebus.py --save-h        # save to HTML
python d_erebus.py --no-save       # skip all save prompts
python d_erebus.py --debug         # verbose error output
Search Indexes
| Index | Type | Reliability |
|---|---|---|
| Ahmia | Structured, large index | High — most reliable |
| Tor66 | Broad dark web index | High |
| Amnesia | Supplementary index | High |
| notevil | Supplementary, uncensored | Medium |
| Torch | Classic, CGI-based | Low — often fails |
INDEXES in d_erebus.py. Add known link farm addresses to LINK_FARM_BLOCKLIST.
Hemera — URL Extractor
Parses an Erebus JSON file and extracts all .onion URLs into a clean text file for Mnemosyne batch scanning. Link-farm flagged hosts are excluded by default.
Usage
python d_hemera.py <Erebus_json>
python d_hemera.py <Erebus_json> --output urls.txt
python d_hemera.py <Erebus_json> --full-paths      # all paths, not just roots
python d_hemera.py <Erebus_json> --include-farms   # include link farms (not recommended)
python d_hemera.py <Erebus_json> --no-save         # stdout only
Output: erebus_urls_<query>_<timestamp>.txt — one URL per line. Can be edited manually before passing to Mnemosyne.
Mnemosyne — .onion Recon
Pre-visit safety scanner for Tor hidden services. Fetches only raw HTTP/HTML over a Tor circuit — no JavaScript execution, no image loading, no cookies. Use before visiting any .onion address.
Install
pip install 'requests[socks]' stem beautifulsoup4 python-gnupg
Usage
# Single URL (interactive)
python d_mnemosyne.py
python d_mnemosyne.py --save
python d_mnemosyne.py --debug

# Batch mode
python d_mnemosyne.py --batch erebus_urls_*.txt
python d_mnemosyne.py --batch erebus_urls_*.txt --save

# Aggressive mode — discover more links to grow the index
python d_mnemosyne.py --batch erebus_urls_*.txt --save --aggressive
python d_mnemosyne.py --batch erebus_urls_*.txt --aggressive --discovery-out queue.txt
Batch mode reads one URL per line (lines starting with # are skipped). Batch scans can take a very long time. A scan of 300 URLs takes approximately one hour.
.onion links found on each scanned page and appends newly-discovered ones (deduplicated) to a discovery queue file — discovery_queue.txt by default, override with --discovery-out. Nothing extra is scanned during that run; the queue is a plain URL list, same format as any --batch input, meant to be fed back in on a future run. This keeps scan runtime predictable instead of letting one page's outbound links balloon the current batch.
Exit codes (scriptable)
0— LOW risk1— MEDIUM risk2— HIGH risk3— CRITICAL risk
Checks Performed
- Reachability, HTTP status, latency, redirect chain analysis
- Clearnet redirect detection — a redirect to any non-.onion domain is a critical red flag
- Ahmia abuse blacklist check (fetched over Tor at startup)
- Security header analysis (CSP, HSTS, X-Frame-Options, and 4 others)
- Script tag enumeration — external vs. inline, clearnet sources flagged
- External resource leak detection — images, fonts, iframes loading from clearnet
- Fingerprinting vector detection (WebRTC, canvas, AudioContext, WebGL, etc.)
- Form analysis — actions, fields, clearnet POST targets
- Well-known file probing —
/canary.txt,/pgp.txt,/security.txt,/robots.txt - PGP canary verification via
gpgin an isolated temporary keyring - Weighted passive risk score (0-100) → LOW / MEDIUM / HIGH / CRITICAL
Accept-Encoding is intentionally excluded from request headers to prevent compressed binary responses.
Khaeos — Intelligence Index
Persistent SQLite-backed intelligence index and time-series tracker for .onion sites. Consumes Mnemosyne JSON output. Khaeos does not scan anything — it is purely a storage and visualization layer.
Install
pip install fastapi uvicorn python-multipart
Usage
python d_khaeos.py                               # start web UI at localhost:7777
python d_khaeos.py --ingest <file.json>          # ingest, then exit
python d_khaeos.py --ingest <file.json> --serve  # ingest, then start server
python d_khaeos.py --db /path/to/khaeos.db       # custom DB path
Both single-scan and batch Mnemosyne JSON files are supported. Duplicate scans (same host + scan time) are silently skipped on re-ingest. The database file is portable — back it up by copying it.
For an external drive setup:
# Recommend aliasing this if using a custom path
alias khaeos='python /path/to/d_khaeos.py --db /Volumes/Drive/khaeos.db'
Web UI
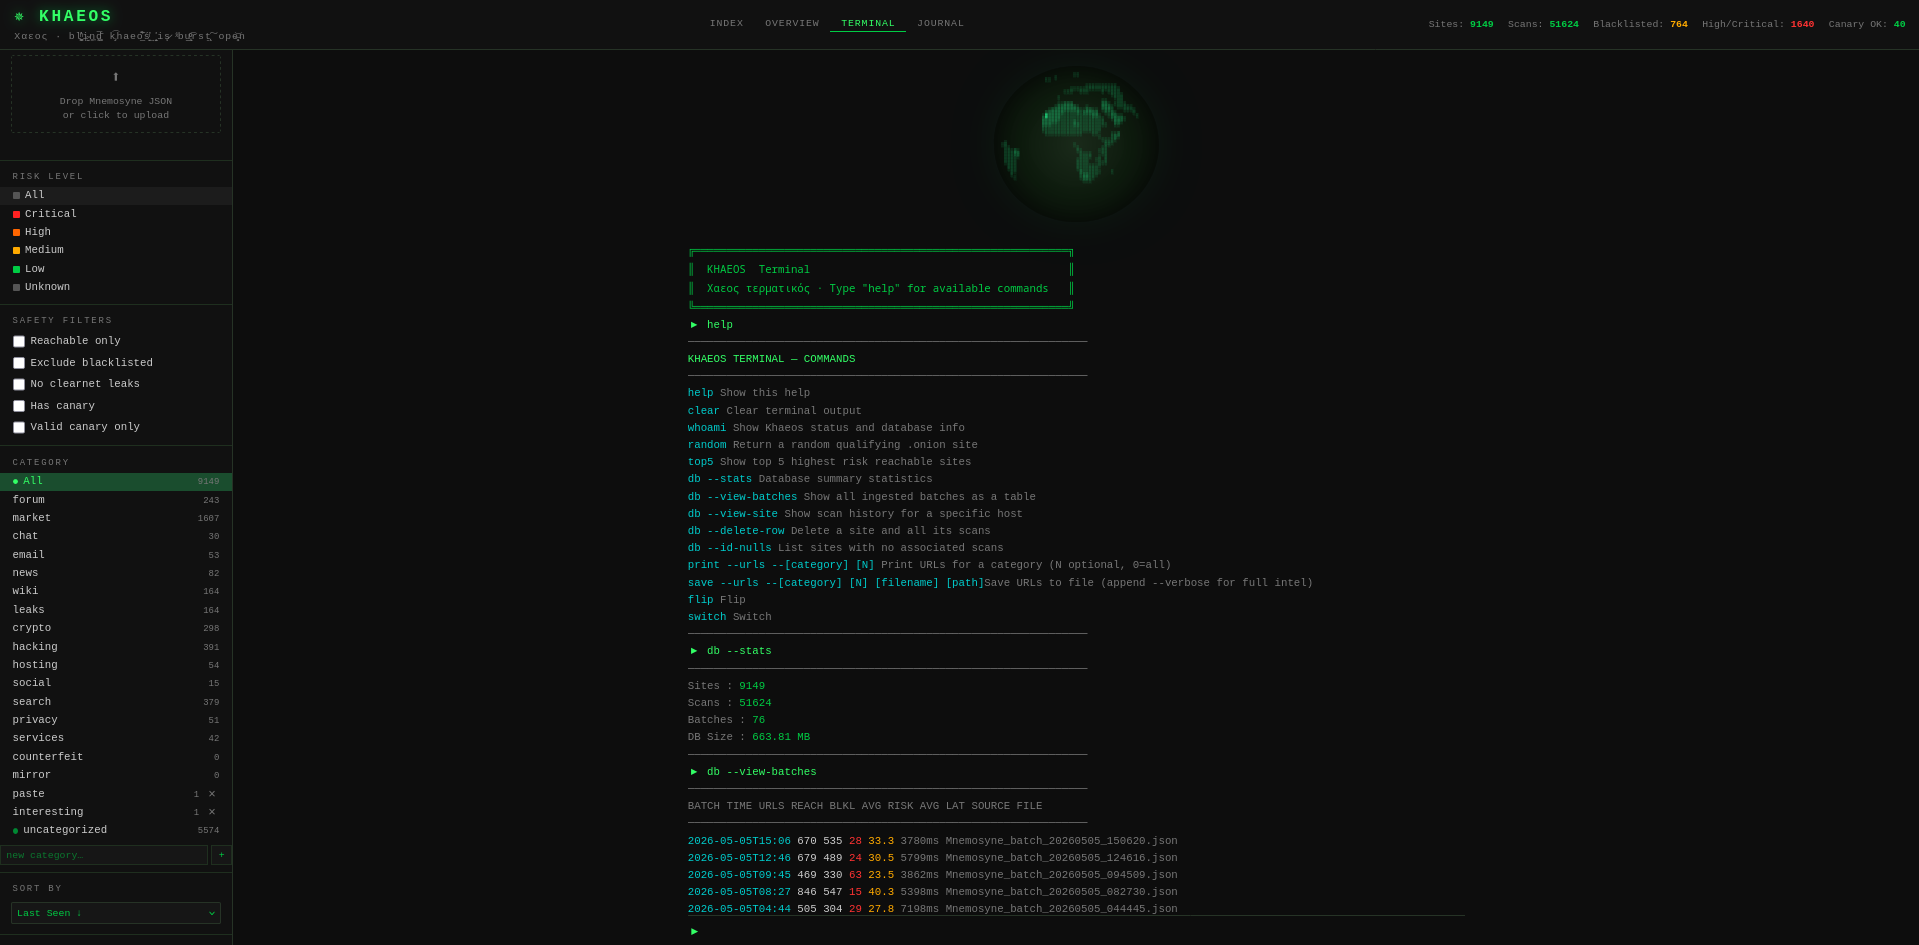
Opens automatically at http://127.0.0.1:7777. Four tabs:
| Tab | Description |
|---|---|
| Index | Searchable, filterable site list. Click any entry for full detail view with time-series charts. |
| Overview | Risk distribution, category breakdown, batch comparison and trend charts. |
| Terminal | CLI interface for database queries, batch viewing, URL export, and site deletion. |
| Journal | Persistent canvas for freehand notes, labeled boxes, and directional connectors. Auto-saves every 45 seconds. |
PGP Verify
Standalone tool to verify PGP signatures against a site's published public key. Useful for checking canary statements, site authenticity, or any signed message a dark web operator publishes. Verification runs in an isolated temporary GPG keyring.
python pgp_verify.py
python pgp_verify.py --debug
Supports both clearsigned messages and detached signatures. Checks fingerprint of signing key against the published key — a mismatch is flagged as a possible key substitution attack.
Installation & VPS Setup
The suite can be run locally or on a VPS for automated scheduled scanning. The VPS setup hardens a fresh Debian 12 instance and configures an SFTP-only user for batch retrieval.
Minimum VPS requirements: 1vCPU, 1GB Memory, IPv4 connectivity.
Local home IP — the public IP address of your local machine.
VPS — the Virtual Private Server of your choosing.
VPS IP — the IP address of the VPS.
VPS User & Directory Structure
The setup script creates two separate users with distinct roles, preventing the SFTP retrieval user from having any access to the tool working directory, and preventing the tool runner from having direct network exposure.
                VPS
                ├── root
                │   └── ~/.aws/credentials          ← canary token (intrusion alert, if configured)
                │
                ├── osint/                          ← SFTP-only user (chrooted)
                │   ├── .ssh/authorized_keys        ← your local machine's public key
                │   └── outbox/                     ← validated batches land here
                │                                      pulled by pull_batches.py
                │
                └── osintd/                         ← working user (runs tools via cron)
                    ├── venv/                       ← Python virtual environment
                    └── dark_osint/
                        ├── d_erebus.py
                        ├── d_hemera.py
                        ├── d_mnemosyne.py
                        ├── pipeline.py
                        ├── run-pipeline.sh
                        ├── validate_batch.py
                        ├── pipeline.log
                        ├── config/
                        │   ├── queries.txt         ← default query list
                        │   ├── queries_monday.txt  ← optional day-specific lists
                        │   └── queries_thursday.txt
                        └── output/
                            ├── discovery_queue.txt     ← --aggressive: links found,
                            │                              queued for next run
                            ├── erebus/Erebus_*.json
                            ├── hemera/erebus_urls_*.txt
                            └── mnemosyne/
                                ├── Mnemosyne_batch_*.json  ← validated → moved to osint/outbox/
                                └── quarantine/
osintd runs cron, never exposed externally · osint cannot read osintd's files
1. Create SSH Keys
On your local machine, generate a key pair for VPS access:
ssh-keygen -t ed25519 -C "vps-dark-suite" -f ~/.ssh/vps_dark_suite
# Verify files exist
ls ~/.ssh/vps_dark_suite*
If your VPS provider lets you add SSH keys in its dashboard before deployment (Vultr, DigitalOcean, Hetzner all do), paste the contents of ~/.ssh/vps_dark_suite.pub there now — you will be able to SSH in as root immediately. Skip to Step 2.
1a. First login with password (if no key was pre-installed)
If your provider assigned a root password instead, use it to log in once and manually add your public key:
# SSH in with the password your provider gave you
ssh root@YOUR.VPS.IP

# Once in, create the authorized_keys file and paste your public key
mkdir -p ~/.ssh
chmod 700 ~/.ssh
nano ~/.ssh/authorized_keys
# Paste the contents of ~/.ssh/vps_dark_suite.pub, save and exit
chmod 600 ~/.ssh/authorized_keys

# Exit and verify key-based login works before running the setup script
exit
ssh -i ~/.ssh/vps_dark_suite root@YOUR.VPS.IP
For more detail on SSH key setup read this blog or your provider's docs.
2. Copy Host Key & Run Setup Script
# Add VPS to known_hosts
ssh-keyscan -H YOUR.VPS.IP >> ~/.ssh/known_hosts

# Copy setup script to VPS
cd ~/Dark_OSINT-main/Pipeline/VPS_Files
scp -i ~/.ssh/vps_dark_suite vps-setup.sh root@YOUR.VPS.IP:~/

# SSH in and run it - pass your HOME IP to vps_setup.sh, not the VPS IP
ssh -i ~/.ssh/vps_dark_suite root@YOUR.VPS.IP
bash ~/vps-setup.sh YOUR.HOME.IP osint
The script installs Tor, fail2ban, ufw, Python 3, configures a hardened SSH config, creates an SFTP-only osint user chrooted to their home directory, and an osintd working user for running the tools.
ignoreip = YOUR.HOME.IP to /etc/fail2ban/jail.
3. Deploy Tools to VPS
# Copy public key to SFTP user
cat ~/.ssh/vps_dark_suite.pub
# SSH in as root, paste into:
nano /home/osint/.ssh/authorized_keys

# Back on local machine:
# Copy tool files — run from the repo root. The pipeline scripts live under
# Pipeline/VPS_Files/ in the repo but land flat in dark_osint/ on the VPS.
cd ~/Dark_OSINT-main
scp -i ~/.ssh/vps_dark_suite \
    d_*.py \
    Pipeline/VPS_Files/* \
    root@YOUR.VPS.IP:/home/osintd/dark_osint/

# In VPS:
# Fix ownership and make pipeline script executable
chown -R osintd:osintd /home/osintd/dark_osint
chmod +x /home/osintd/dark_osint/run-pipeline.sh
chown osintd:osintd /home/osintd/dark_osint/run-pipeline.sh
4. Cron & Queries
# Install cron for osintd
crontab -u osintd -e
0 2 * * * /home/osintd/dark_osint/run-pipeline.sh >> /home/osintd/dark_osint/pipeline.log 2>&1
Query files
Queries can be set day-specifically. The pipeline checks for queries_monday.txt (etc.) first, falling back to queries.txt. Query files should be formatted one query per line (blank lines and lines starting with '#' are ignored) with no fixed count required; 6 queries (lines) per query file is the recommended number:
nano /home/osintd/dark_osint/config/queries.txt
nano /home/osintd/dark_osint/config/queries_monday.txt
run-pipeline.sh validates and moves every batch file produced by that run (tracked via a timestamp marker, not a hardcoded count), so it should cope fine whether a query fails, succeeds, or you change how many queries are in your query file. Be mindful of total runtime: each Mnemosyne batch scan takes roughly 1 hour per 300 URLs, and a single Erebus run with --pages 10 across all indexes can surface 200–400 URLs per query. If the pipeline runs longer than the gap between cron executions, jobs will overlap and compete for the Tor circuit. The default cron time is 2am daily — if you are running more than 3–4 heavy queries, consider either reducing --pages, splitting queries across days using the day-specific query files, or moving the cron to a time with more headroom.
VPS Communication
push_queries.py
Manages the query files on the VPS over SFTP without needing to SSH in manually.
# View current queries
python push_queries.py --vps-ip YOUR.VPS.IP --show

# Replace all queries
python push_queries.py --vps-ip YOUR.VPS.IP --set "forums" "markets" "wiki"

# Add queries without removing existing ones
python push_queries.py --vps-ip YOUR.VPS.IP --add "pastebin" "dump"

# Weekly schedule
python push_queries.py --vps-ip YOUR.VPS.IP --schedule \
    monday "forums" "markets" \
    thursday "pastebin" "leaks"
All options
| Flag | Default | Description |
|---|---|---|
| --vps-ip | $VPS_IP env var | VPS IP address. |
| --vps-user | root | SSH username for push_queries — this connects as root (or whichever user has write access to the osintd config directory), not as the SFTP osint user. |
| --key | ~/.ssh/vps_dark_suite | Path to your SSH private key. |
| --dry-run | off | Show what would be pushed without connecting. |
push_queries.py connects via SSH as root (default --vps-user root) because it needs to write into /home/osintd/dark_osint/config/, which the chrooted SFTP user cannot access.pull_batches.py connects via SFTP as the osint user (default --vps-user osint), which is chrooted to /home/osint/ and can only see the outbox.Both use the same key by default. If you have separate keys for root SSH vs SFTP access, pass
--key explicitly to each.
pull_batches.py
Downloads validated Mnemosyne batch files from the VPS outbox via SFTP, verifies SHA256 checksums, and optionally ingests them directly into Khaeos. Requires pip install paramiko.
python pull_batches.py --vps-ip YOUR.VPS.IP
python pull_batches.py --vps-ip YOUR.VPS.IP --no-ingest  # download only
python pull_batches.py --vps-ip YOUR.VPS.IP --no-delete  # keep on VPS after download
python pull_batches.py --vps-ip YOUR.VPS.IP --dry-run    # preview only
Files that fail checksum verification are automatically quarantined and not ingested. A sidecar .sha256 file is required alongside each batch (written by validate_batch.py on the VPS).
All options
| Flag | Default | Description |
|---|---|---|
| --vps-ip | $VPS_IP env var | VPS IP address. Can be set as an environment variable instead of passing every time. |
| --vps-user | osint | SFTP username. Change this if you passed a custom username to vps-setup.sh. |
| --key | ~/.ssh/vps_dark_suite | Path to your SSH private key. |
| --remote-dir | /outbox | Remote outbox directory. This is relative to the chroot — it maps to /home/osint/outbox on the VPS. |
| --local-dir | Khaeos/batches_for_ingestion (in this repo) | Local directory where downloaded batch files are saved before ingest. |
| --khaeos-db | auto-detect | Path to khaeos.db. Required if you use a custom DB path or external drive. |
| --no-ingest | off | Download and verify files only — skip Khaeos ingest. |
| --no-delete | off | Keep files in the remote outbox after downloading. Default is to delete after successful verified download. |
| --dry-run | off | Show what would be downloaded without connecting. |
export VPS_IP=YOUR.VPS.IP in your shell profile (~/.zshrc or ~/.bashrc) and both pull_batches.py and push_queries.py will pick it up automatically. You can also alias the full command if you use a non-default key path or SFTP username.
# ~/.zshrc or ~/.bashrc
export VPS_IP=YOUR.VPS.IP
alias pull-batches='python /path/to/pull_batches.py --vps-user myuser --key ~/.ssh/mykey'
OPSEC & Disclaimers
- Assume all requests are logged and results may be manipulated.
- Never enter PII or sensitive search terms — these are likely logged by the search engines themselves.
- Use Tor + VPN (VPN first, then Tor). Whonix is the strongest option for a VM setup.
- The Mnemosyne scanner fetches only static HTML — no JavaScript is ever executed, no images are loaded. While this significantly reduces fingerprinting surface, it does not eliminate it entirely.
- validate_batch.py reduces the risk of malformed or injected files reaching your local machine, but it cannot protect against a compromised VPS writing a valid-looking file. A structurally correct batch with plausible field values will pass validation regardless of how it was produced. This risk can be mitigated by treating the VPS as untrusted and spot-checking the downloaded JSON manually. The canary token described below exists partly for this reason: if the VPS is compromised, you want to know before you pull from it.
- The author does not assume liability for misuse. These tools are for authorized research only.
Canary Token (VPS Intrusion Alert)
Plant a fake AWS credential on the VPS. If an attacker gains access and attempts to use these credentials, you receive a near-instant email alert from canarytokens.org.
- Go to canarytokens.org/nest, select AWS API Key, enter your email and a descriptive note (e.g.
Dark-Osint-VPS-canary). - Copy the generated credentials and place them on the VPS:
mkdir -p /root/.aws
nano /root/.aws/credentials
[default]
aws_access_key_id     = ABCDEFG123456EXAMPLE
aws_secret_access_key = abcdEFG123LoNGstr1NGEXAMPLEKEY
region                = us-east-1
Test it yourself by attempting to use the credentials and verifying you receive an email. The service is entirely free for this use case.
Pictures
Screenshots of the tools in use.
Khaeos